Thermaltake Tsunami: A Complete Visual Overhaul
by Purav Sanghani on September 10, 2004 12:00 PM EST- Posted in
- Cases/Cooling/PSUs
Internal Design
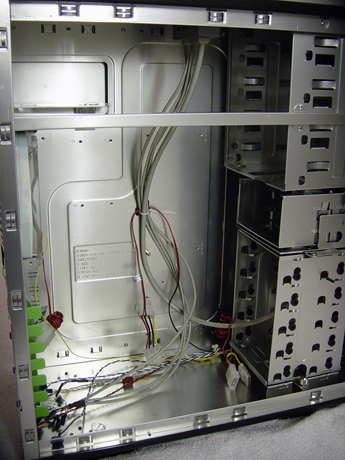
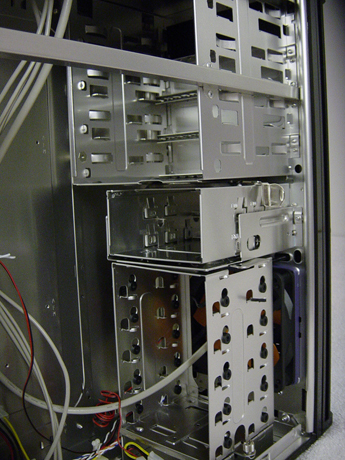
After removing the right side panel, we took a closer look at the Tsunami's aluminum insides. Though the size of the case compares to that of the Cooler Master Centurion and the Enermax Sea Hawk, we were amazed at how much Thermaltake packed into the Tsunami.At the front of the case reside the drive bays. There are four 5-1/4" drive bays at the top. Thermaltake has carried on their drive rail idea to the Tsunami and has included enough to install the four 5-1/4" drives without any hassle. A tool-less design isn't fully implemented, but the most important areas do have devices to make installation much easier.
Below those bays are two 3-1/2" floppy bays and this is where things get interesting. This bay can be removed by pulling back on the spring clip and pulling the carriage back. We did see a flaw in this design in that while components like the motherboard are installed, the carriage cannot be easily removed from its place. These bays do not use drive rails and require screws to secure floppy drives.
A total of 5 HDD's can be mounted in the second removable drive carriage at the bottom of the case. The bays have rubber mounts to absorb any shock that could damage installed hard drives. Thermaltake has included thumbscrews to mount HDD's in place. This carriage is also easily removable, unlike the first one, by removing the thumbscrew which anchors the bay, pressing down on the release and pulling the carriage outwards to the left side of the case.
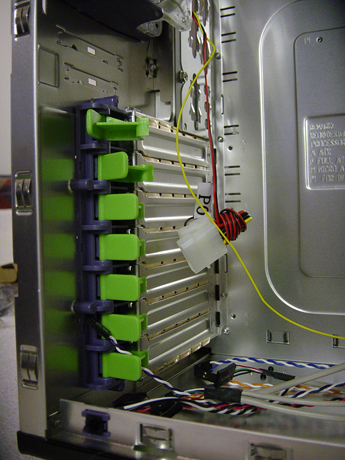
Moving on to the expansion slots, we see a new securing device for expansion cards. Instead of sliding clips, which Thermaltake has used in the past, we noticed that they implemented a new horizontally pivoting clip, which holds cards in place. They are just as effective, if not more, as the sliding clips.
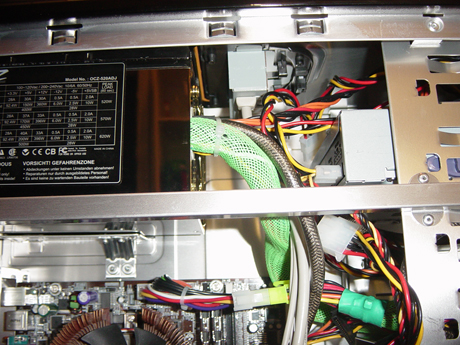
Looking up to where the power supply is mounted, we noticed the lack of space needed to install an oversized unit, or any unit at all, successfully. The bundle of wiring from the auxiliary ports at the top of the case interfered and needed to be removed in order to slide the power supply in place. The cross bar that provides support to the chassis structure, since it is aluminum, was also a block in the road, but we figured there was nothing that the manufacturer could do to get rid of this. We installed our test bed motherboard in the Tsunami first, so our Zalman heatsink fan became a huge problem also. Instead of removing the heatsink, we decided it would be easier to remove the auxiliary pod. Our OCZ PowerStream just barely slid into place.


31 Comments
View All Comments
JohnnyCNote - Friday, September 10, 2004 - link
JarredWalton - Friday, September 10, 2004 - link
#2 echoes my thoughts, except there is one major difference from the SLK3700-BQE: the hard drive cage is rotated on the Antec.If that is truly the case (ow - bad pun!), then I can almost certainly vouch for the difficulty of putting a PSU into such a case after the other components are installed. My Antec PSU started having fan issues, so I replaced it with a Thermaltake Polo12. With a Zalman CNPS7000a heatsink on the motherboard, it was almost impossible to get the PSU into position without removing the motherboard. I eventually succeeded after taking out all the CD/DVD drives, but I think if I have to do it again, I'll just save myself the trouble and removed the motherboard. Which is really not saving much trouble. :(
So, install your PSU first in these cases, and pray to whatever gods you hold dear that your PSU doesn't die before you're ready to upgrade the system. ;)
Other than that, it's a nice looking case, other than the orange fan on the window.
LocutusX - Friday, September 10, 2004 - link
To article author:Please address the points raised by me in #3 and the other person in #8. Thanks!
(IMO, swapping PSUs seems to be pretty frequent nowadays among enthusiasts - almost as frequent as swapping mobos, in fact)
GhandiInstinct - Friday, September 10, 2004 - link
So let me get this right, I'll have to install my PSU before my motherboard? And I'll have to remove the top audio/fw/usb?Also, I didn't see anything said about the filter in the front of the case, on the 120mm.
Happy Buddha - Friday, September 10, 2004 - link
NIce review. There is still something I'd like to be add on the thermal and sound benchmark; since I am(and sureley other) interest in buying this case with the non-window version wich do not have the 90mm side fan, I't would be nice if you could redo these Bencmark with the side fan off + completly plug the hole. This way it would make a fair comparison of the two version available for this case. Thanks.whitelight - Friday, September 10, 2004 - link
#5 - it won't work against the CPU fan. if you have a side intake fan, you can duct cold air directly onto the cpu. and you obviously shouldn't use the CPU fan to suck air from the heatsink, rather using the CPU fan to blow air onto the heatsink.jkostans - Friday, September 10, 2004 - link
If the Side fan is an intake, how does it work against the CPU fan? I've never seen a CPU fan move air any direction but through the heatsink towards the motherboard. Maybe I'm wrong.....ciwell - Friday, September 10, 2004 - link
FINALLY! Thanks for the review I have been waiting for. ::thumbs up::LocutusX - Friday, September 10, 2004 - link
The problem I had with my Tsunami was that I couldn't figure out how to open the top cover, making it quite difficult to swap PSU's - I guess that relates to the whole "front audio/USB pod" thing, and because they put that there, they had to permanently nail down the top cover?That's too bad, it means you'll probably have to remove the motherboard whenever you swap PSU's.
themelon - Friday, September 10, 2004 - link
Its almost identicle on the inside to the Antec SLK3700. Same 5 and 2 bay drive cage, same fan placement. The only major difference I see is the flip up clips for the expansion card mounting.